Composting 201
By CompostMan Stan
This blog has second-level tips and tricks about each of the basic’s from the Learn to Compost blog. I’ll go through them one at a time.
Moisture
The greens, the food waste, manure, etc. are already moist and often are a source of moisture for the compost pile. They don’t need much preparation The Browns, the high carbon, dry-might-burn ingredients like leaves, sawdust, paper, etc. are the ingredients that need the extra attention. Remember you’re working to get the assembled pile to 50% moisture. This is the consistency of a damp sponge throughout the pile.
It’s best to moisten the browns before adding them to the pile for several reasons. Leaves have a cuticle, a coating on the surface that keeps the plant from drying out and unfortunately can keep water out also. A good first step is to collect the leaves with a bagging lawnmower. The cuts in the leaf expose the spongy interior that can absorb water. Large intact leaves often act like shingle turning the water away from the material under them. After bagging spread the leaves out in a low pile and spray that pile with water. Once it’s wet covering the pile with a tarp can trap the moisture and create a high humidity zone where the leaves can absorb moisture. Doing this for several days is recommended, maybe longer if you’re dealing with wood chips. You’ll know the job is finished when the color is darker and the material is wet all the way through and heavy. Adapting this technique for the browns you have will put you on the way to having a successful pile. On last tip is to put unmowed leaves in a large black plastic trash bag, add several gallons of water and tie off the top. The humidity will be really high in the bag and after perhaps a week the leaves will be damp.
Once your pile is assembled, water is less of a concern because it’s harder to add water then. Pouring or spraying water on top is no guarantee that all the surfaces in the pile will get wet and the liquid water with run right though the spaces onto the ground. One technique that has had some success is to use a root feeder. This is a 3-4 foot metal pipe with openings at the bottom and a handle and shutoff valve on top. Turning on the water you can plunge the pipe into the pile and get water almost any where in the pile. Going slower with low water pressure and moving the pipe more often are better techniques than faster with more water pressure.
Depending on your climate you may want to cover the pile. In the desert the low humidity will dry the pile and a tarp or plastic sheeting can keep it damp. If it’s rainy season a pile can be waterlogged and all the air spaces fill with water, creating a foul smelling mess. In this covering you pile can keep excess water out and your hard won nutrients in.
Materials
This is another critical part of compost pile success. To cause the bacterial storm we want, we need to assemble a palatable ration for the critters (primarily bacteria). The mix is always carbohydrates and proteins. Pasta and meatballs, steak and potatoes are some of the pairings that we’re familiar with and that same kind of mix holds true for our microbial friends. The good news is we can be very creative in feeding the bugs as long as we have an approximate balance of the greens (proteins) and browns(carbohydrates)
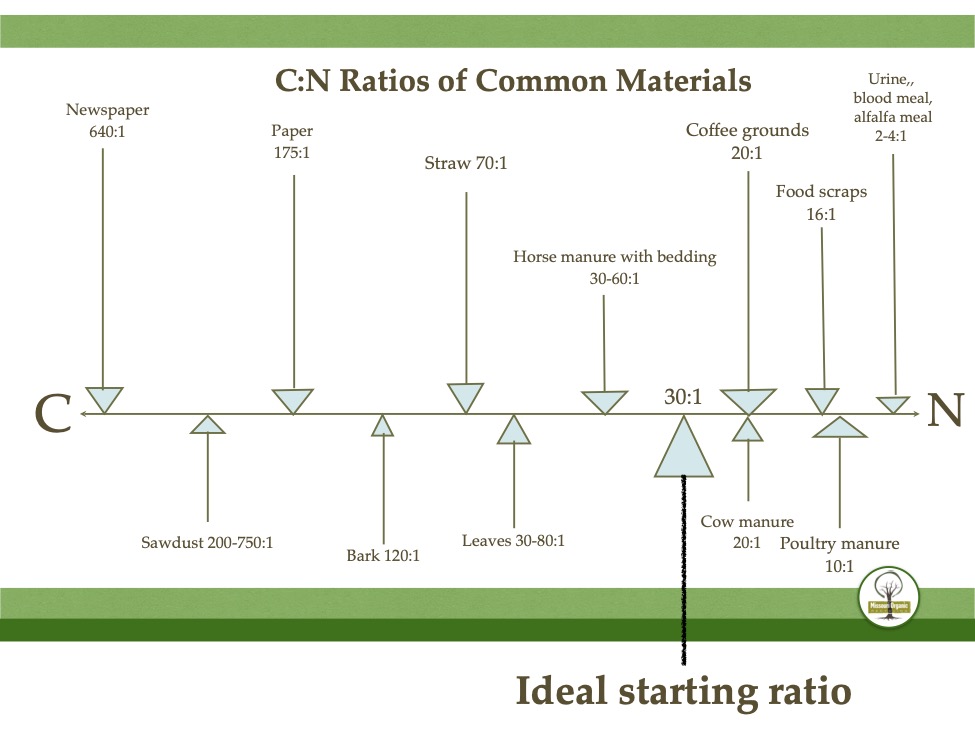
The balance between greens and browns is called the Carbon:Nitrogen ratio or C:N. Although there are not compost piles in Nature, there are great mixes that we see all around. Looking at the chart below, horse manure and bedding with some urine automatically present need no attention. Pile it up, notice that it has gotten hot and in 3-6 months even without turning a perfect batch of rich compost will magically appear. It’s not magic, of course, it’s just a common place mixture of barnyard ingredients. Even better news is that almost any combo of greens and browns will work. (The bugs aren’t picky) You could have a pile of coffee grounds and paper. As long as it’s mixed and moist, it will compost. The types of organic materials are pretty wide and varied. I’ve made good working piles with sweet bum leaves and balls mixed with urea fertilizer. Another strange one was dog food and boxes of starch. The possibilities are endless. Industrial composting can get really interesting, especially in a city with truckloads of pizza dough, tanker trucks of beer dregs, semi-trailer loads of vegetable scraps from Domino’s and dog food from a factory.
There is a basic rule of thumb for composters regarding the C:N ratio. If the pile doesn’t heat up, it’s too dry or has too many browns. If the pile has a bad smell, It’s too wet or has too many greens. Fortunately home composting mostly revolves around leaves and food waste or grass clippings. Don’t worry much about the “correct ratio,” just forge ahead and you’ll soon get the feel of what’s needed.

Turning
Keeping that core of good composting action at the center of a pile is the outer layer (the skin) that is not moist enough or warm enough to decompose. Turning or re-mixing your pile will put the uncomposted outer layer in the middle and let it start to break down. The dry material will get more moist and bacteria can start to decompose it. This is also a great time to inspect the pile to see what’s been happening. This is an important chance to water the pile again. A garden hose with a nozzle can let you water as you go making sure there is adequate moisture everywhere as you rebuild the pile. Adding more ingredients is fine, just continue to mix or layer the new ingredients as you did when you built the pile. Compost piles shrink by a considerable amount (up to 65%) as they decompose. This can be discouraging to see all that work turn into such as scrawny pile. Add more material to the pile at this time to increase your yield. Use a potato fork with 4-5 prongs to turn your pile. A shovel doesn’t work well and a large 10-12 prong silage fork will pick up a load of compost that is too heavy to handle comfortably.
Mass
This is an easy concept. Composting needs a warm, moist place to happen. Bigger is better in this regard. A mouse of a pile is too small to hold heat or moisture. It will dry out or cool off and decompose at a very slow rate. Somewhere between a cube with three feet on a side to one with five feet on a side is recommended. No bin or containment is necessary but for appearance or for keeping pests out a bin can be just the ticket. There is no best kind of bin. The variety of bins is seemingly endless from custom molded plastic forms to scraps of wood and wire screwed together.
One final thing about ingredients- they’re seasonal. You have plenty of brown leaves in the fall and much less in the spring and summer. Greens are abundant is spring and summer but not in the fall and winter. Use your food scraps so you have green material all year and save a few bags of leaves to use as browns in the summer.
There are a wide variety of Compost Bins to choose from.

Attractive design, vermin-proof, high capacity

Inexpensive welded wire, easy access by unhooking the ends. Turning is easy if you set the wire up next to the pile.
Dual chamber tumbler lets one batch “finish” while the other chamber is active, Simple turning mechanism requires little effort, vermin-proof. Best tumbler we’ve found.


Deluxe pallet design is fully enclosed with wire. The smaller top section allows easy access for additions. High capacity with two large pallet bins.

Small plastic bin is vermin-proof and attractive. Easy harvesting through the bottom panel. Limited quantities can be added at any one time.
Turning
Keeping that core of good composting action at the center of a pile is the outer layer (the skin) that is not moist enough or warm enough to decompose. Turning or re-mixing your pile will put the uncomposted outer layer in the middle and let it start to break down. The dry material will get more moist and bacteria can start to decompose it. This is also a great time to inspect the pile to see what’s been happening. This is an important chance to water the pile again. A garden hose with a nozzle can let you water as you go making sure there is adequate moisture everywhere as you rebuild the pile. Adding more ingredients is fine just continue to mix or layer the new ingredients as you did when you built the pile. Compost piles shrink by a considerable amount (up to 65%) as they decompose. This can be discouraging to see all that work turn into such as scrawny pile. Add more material to the pile at this time to increase your yield. Use a potato fork with 4-5 prongs to turn your pile. A shovel doesn’t work well and a large 10-12 prong silage fork will pick up a load of compost that is too heavy to handle comfortably.

Time
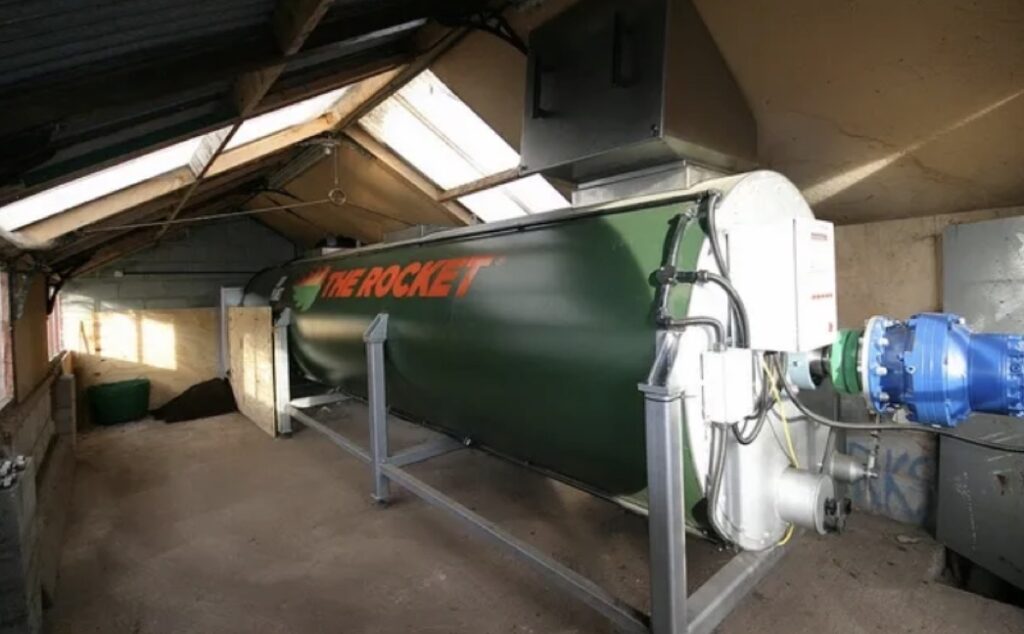
Even though bacteria reproduce rapidly into unfathomable numbers, they’re not the only species needed for the full transformation. The complex ecosystem of a compost pile proceeds at its own pace and shouldn’t be hurried. Keeping all of the parameters in the best possible range will optimize the process. On the industrial side of composting, time is money and large tumblers that computer control the oxygen flow and temperature can turn out a mostly finished compost in two weeks. That material doesn’t smell and the ingredients have been completely transformed, but it still needs to sit and cure for a couple of months. Like wine and cheese, compost is better with age. So don’t be anxious about your compost, It’s not a race. I harvest my compost once a year in the early fall. I”ll apply some and let some age over the winter in my greenhouse so that its in prime condition for my spring potting soil.


